
I love to create listening labyrinths because they make fantastic informal assessments of students’ ability to discern the difference between two sounds. The icing? Students love them!
Let’s say you have students who often use a short i sound when they need a long e sound (and vice versa). Here’s what you do:
Here’s how to create listening labyrinths.
Before you begin, create a list of as many minimal pairs with those two sounds as you can. What are minimal pairs? They are words that sound the same except for ONE sound. For example: is/ease. Sign up below and grab my free mini-lists to get you started! Now, let’s get started!
First, set up the table.
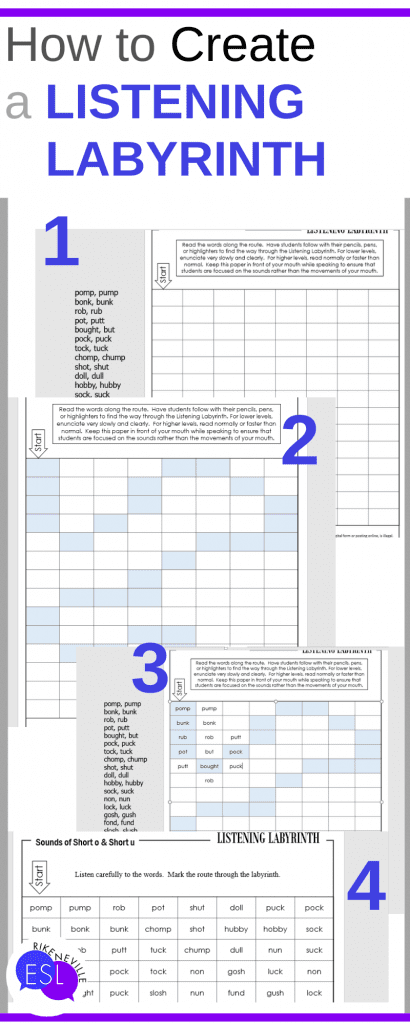
- Once you have your list of minimal pairs, scan it and find the LONGEST word you have. This will help you determine the size of your table. In whatever program you like, create a table. I find that 8 columns with 14 rows work well for me. You could increase the number of rows, but increasing the columns would require using a small size for your words, and who likes squinting?
- Put your longest word in one of the boxes and set it to the font and size you want. Does it fit? How small do you need to make the type? I generally set the whole table to the font and size that best suits my longest word, unless all the other words are much shorter. Then I just make that one word a smaller type size than the rest.
- Okay, delete the word. It’s just in the way. We’re going to go a little backward and make the answer key FIRST because it’s easier that way.
Second, create that winding labyrinthine trail.
- Choose a color and create a winding trail from the top to the bottom of the table. You can choose to make the boxes share a side, or you can include corners (more challenging). Highlight rows and columns and change the background color until the trail is complete. Got it?
- Now, using your list of minimal words, fill in the boxes so that students must be able to hear the difference in each minimal pair to know where to go next. Be careful! Fill in the boxes with words that ensure there is only ONE correct choice to make to continue. Just follow your colored trail to the end.
- Go back and randomly fill in the remaining boxes, still being careful not to provide an alternate route through.
Finished? Yay! You have the answer key! Now highlight that whole table, copy it, and paste it onto another page. Highlight it again and delete the color background. Boom! You’ve got your student page that you can print to create as many listening labyrinths as you need for your class!

Here’s how to conduct listening labyrinths.
All right, now that you’ve got your first set of listening labyrinths ready to go, let’s talk about how to use them with your students.
- Give each student a listening labyrinth, and have your answer key ready because it also functions as your teacher page.
- Tell your students to use a pencil (or marker, highlighter, or crayon if they are especially confident and daring) to mark the route from top to bottom as you say each word in turn. Yep, you’ll be reading from the answer key that you made. By the way, make sure you cover your mouth (you can use the answer key for that as well) to direct your students’ attention solely on the sounds of the words and not the shape of your mouth as you make the sounds.
- Speak slowly or quickly, repeat the words or not. It’s totally up to what best suits your group of students.
And that’s it! Fairly easy, but it does take some time to create listening labyrinths. If you don’t have the time or would rather spend your time doing something else, check out my pronunciation resources in my TpT store! Almost all of them include a listening labyrinth among other activities (like full-color photo digital presentations!)
Read more about adult ESL pronunciation!
- Pronunciation Truly Matters!
- Improve English Pronunciation with 4 Strategies to Overcome Strong Accents
- Two Helpful Tips for Teaching Pronunciation
- Sh/Ch: 3 Must-Have Methods for Successful Pronunciation Tweaks
- 4 Surefire Strategies for Refining R/L Pronunciation
Leave a Reply