

So, you’re teaching adult ESL true beginners, and you need to teach the alphabet. You know there are millions of resources and ideas for teaching the alphabet, but everything you find is made for young children. Your adult students don’t need to be tracing a letter in a tray of sand. They need age-appropriate activities that respect their intelligence while building this foundational skill.
I knew before I ever taught my first true beginner that teaching the alphabet to adults required completely different approaches than teaching kids. At the time, I just lacked the resources and specific ideas to make it happen.
It took some trial and error, but I eventually had a pretty good set of activities to draw on, and now I want to share them with you.
1. Practice Alphabetical Order (Yes, Really)

Wait, is alphabetizing even relevant anymore? I mean, we don’t flip through paper dictionaries like we did in 1995.
But here’s the thing: alphabetical order is everywhere. At a conference? You can find your name tag because they’re all in alphabetical order. So are your phone contacts and computer files. Take a look at a book index, and it’ll be in alphabetical order. Try finding your way through any organized system without it.
Last semester, my student Wei needed to pick up her name tag at a university event. The organizers had sorted them alphabetically, and she found hers within seconds. On the walk back to class, she said, “In China, we don’t organize like this. Here, everything is A-B-C order.” She paused. “Is good system.”
Exactly, Wei.
Try this: Say a string of letters, something like “P, F, A”, and have students repeat them back in alphabetical order. Start with three letters, then build up.
Make a grid with all 26 letters placed randomly. (Leave two blank spaces so the grid is even because my brain can’t handle asymmetry.) Students work in pairs. One person points to letters in alphabetical order while the other identifies them. Switch roles.
I’ve had students who struggled with this activity at first but started racing each other with it by the end. There’s something satisfying about mastering a system.
2. Use Modified Spelling Activities
Your students will need to spell aloud their names (as well as the names of a spouse and any children) more than they realize, like when making doctor’s appointments, checking in at hotels, ordering over the phone, calling to make reservations for anything. And not just their names, but their home address and email address as well.
I once overheard a woman at the front desk of a doctor’s office trying to spell her name—Stefani. The receptionist asked, “Is that with a ph or an f?” The woman looked confused and tried to spell it out, but stumbled on pronouncing the letters clearly. The receptionist guessed and typed something. The woman shook her head, frustrated, and tried again.
That’s when I realized that my students needed to practice this. Not just spelling letter by letter, but pronouncing each letter clearly enough to be understood.
Try this: Share your own stories about having to spell or correct your name. (I promise you either have them or have heard one you can claim as your own.)
Have students spell their names and their family members’ names to a partner who writes everything down. Then have them check together for accuracy. “B or p?” Teaching the clarification technique: “D as in dog” saves so much confusion.
The Spelling Error Game:
Write out simple three-letter words where each letter matches its common sound—pat, sit, dog. Then dictate the spelling using one wrong letter: “d-a-t.” Students correct you by spelling it back and emphasizing the correct letter: “P-a-t. P as in paper.”
Keep word lists short, like maybe ten words maximum per group. This way students aren’t searching forever for corrections, and you can reuse “pat” later as “b-a-t” to keep them on their toes.
This activity hits multiple skills: listening comprehension, letter recognition, pronunciation clear enough to be understood.
The Mix-Up:
This is trickier. Use four-letter words. Dictate all the letters but scrambled. Say “s-o-p-t” and have students correct you with “p-o-s-t.” It helps if you provide them with a word bank.
My student Ahmed loved this game. He’d get this satisfied look every time he unscrambled one correctly, like he’d just solved a puzzle. Which, I guess, he had.
3. Send Them on an Alphabet Scavenger Hunt
It’s a gorgeous day and you’re all trapped in a fluorescent-lit classroom teaching the alphabet. Wait, no you’re not.
Send them outside. Have them photograph at least one thing starting with each letter of the alphabet. Partner them with someone who doesn’t share their first language if possible.
Follow up by having them create a digital presentation with their photos in—you guessed it—alphabetical order.
Can’t leave campus? They can find images online. Assign a theme like food or animals to narrow the search.
I did this once with a class right before Thanksgiving break. Most students found straightforward items—apple, book, chair. But one student got creative and photographed the campus water fountain for W, then zoomed in on droplets for D. Another student’s entire alphabet focused on campus buildings because she was studying architecture and couldn’t help herself. Both presentations worked perfectly.
4. Have Them Make Their Own Alphabet Books
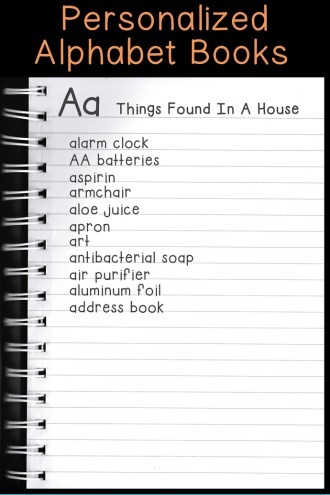
I’m not much of a fan of generic alphabet books for classroom use. Why should every student memorize that A is for apple when half of them don’t even like apples? And the words are often not particularly helpful for adults to know. But when students make their own alphabet books? That’s when it gets good.
Assign a broad theme that gives them focus but lets them choose words that matter to their actual lives.
For example, I assigned one of my students the topic of “homestay life” because he had just moved in with a homestay family. He loved it because it gave him a purpose in approaching his homestay family with questions, and it helped him get to know the names of things in his home environment. His focus on the kitchen resulted in his homestay family discovering that he loved cooking and wanted to cook for them.
Try this: Have students use paper to fold into flip-books or just write a letter at the top of each page in a notebook and make lists of things in their homes. First, have them only write the words they already know. Next, have them use a dictionary or translating app to find the words for things they don’t know yet but want to know.
They’ll build an alphabet book that has meaning for them and represents what they know or what to know instead of random words they are not interested in.
5. Play Musical Alphabet Letters
Getting students up and moving fires up neurons and helps them think and remember. This is technically a kids’ game, but use age-appropriate music and it works beautifully with adults.
You’ll need index cards.
Write one letter per card. Use uppercase, lowercase, or both.
Arrange them on the floor in a circle or any meandering path that doesn’t dead-end.
Students walk along the cards while music plays. Every time you stop the music, they identify the letter nearest to them.
Add challenges like a word starting with that letter, the letter before or after it in alphabetical order, or the sound it makes.
I used this with a class of mostly students in their twenties who were skeptical at first. But I played clips of music from their countries, and suddenly everyone was into it. One woman from Brazil started dancing between the letters even when the music was playing. The whole energy shifted.
6. Practice Filling Out Forms
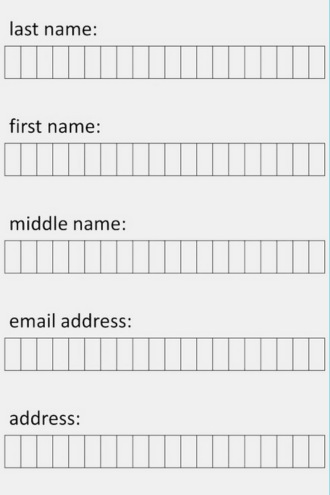
You know those forms where you write one letter or number per box? Those are perfect for practicing letter formation with adult students. Most of them will readily realize the real-life application.
Use this to assess how they form letters. Transform it into a listening activity with partners. Just have one student request the information and one student give it.
“Name, please?”
“Jieun”
“How do you spell that?”
“J-i-e-u-n.”
“J-i-e-u-m”
“No, J-i-e-u-N as in November”
This is so practical it hurts. Your students will use this exact skill sooner than you’d expect.
7. Display a Variety of Fonts
Have you noticed how very different the same letter looks depending on the font?
To us, every version of the letter A or G is obviously an A or a G. But to students whose first language doesn’t use the Latin alphabet? Not so obvious.
When teaching the alphabet letters, show them in multiple fonts. Your students need flexibility in recognizing letters because they’ll encounter so many variations outside the classroom.
This is why printed flashcards are terrible for teaching the alphabet. They always come in only one font. Make a PowerPoint so you can utilize tons of fonts and make the letters large enough for everyone to see—unlike a flashcard someone’s squinting at from the back row.
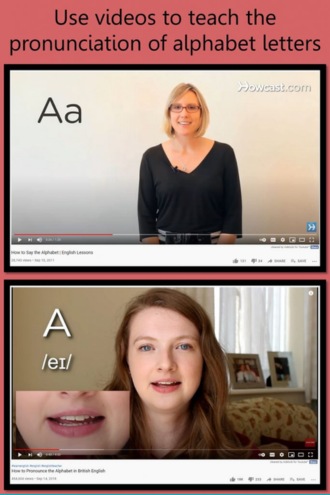
8. Use Videos to Help with Pronunciation
Correctly pronouncing alphabet letters, like any other word, can be hard. If you’re comfortable with it, create videos of yourself saying the letters. Your shyer students who feel embarrassed speaking in class can watch these at home and use a mirror to copy your mouth movements.
Zoom in on your mouth or at least your face.
Not comfortable showing your face? YouTube has people who are. There are good videos for American English and British English depending on your preference. Try this one if you want an American accent ↗. Tell your students to start at 24 seconds. Don’t want an American accent? Use this one if you prefer British English ↗.
I made videos for my students once and felt ridiculous doing it. But a few students told me they watched them repeatedly at home. One student’s pronunciation of the letter names improved so dramatically that when I heard her, my jaw dropped open like I was some sort of cartoon character.
Worth the awkwardness.
9. Go with a Classic Game
Bingo helps everyone relax and shake off language-learning stress. Students who’ve played it before find comfort in the familiarity. Students who haven’t love how simple it is.
Make bingo cards with uppercase letters, lowercase letters, or uppercase and lowercase pairs together. Include pictures representing the letter sounds if you want.
Call out the letter name, the letter name with its sound, or just the sound. Encourage students to repeat each letter you call.
I’ve never met a student who didn’t get into bingo once we started playing. Even the most serious, reserved students who claimed they didn’t like games would suddenly get competitive about covering their cards first.
10. Alphabet Smackdown
Get two new fly swatters of different colors.
Write alphabet letters randomly all over the board or tape letter cards all over a wall. Put slips of paper (one letter per slip) in a container.
Choose two volunteers and give each a fly swatter. Depending on their competitive nature, you may want to draw a line they must stand behind until they hear the letter.
Choose another volunteer to be the speaker. The speaker draws a slip and says the letter.
The two with fly swatters race to locate and smack that letter first. Sometimes they’ll both try to swat the same letter (right or wrong) at the same time, so make it a rule that they must KEEP their fly swatter on the letter so you can see who got there first. This doesn’t mean that they can’t change their mind and swat a different letter, but only the FIRST person to correctly smack the letter wins the point.
After five letters or so (odd numbers ensure no ties), rotate in new students and a new speaker.
This game is ridiculous. It’s also the most engagement I’ve ever gotten from alphabet practice. I’ve had students who dress elegantly and move with quiet reserve absolutely losing their minds trying to smack the letter Q before their competitor. The classroom energy during this game is unmatched.
The Bottom Line
The alphabet is a foundation that cannot be ignored.
Too often, beginning students get rushed through the alphabet with the only goal being to recite the letters in order. That’s not enough.
Spend real time building this foundation with them. When you do, every other skill comes more readily.
Your students are smart, accomplished adults who deserve activities that respect their intelligence while teaching them something they genuinely need. Give them that, and watch what happens.
That’s it from me! See you in the next post!
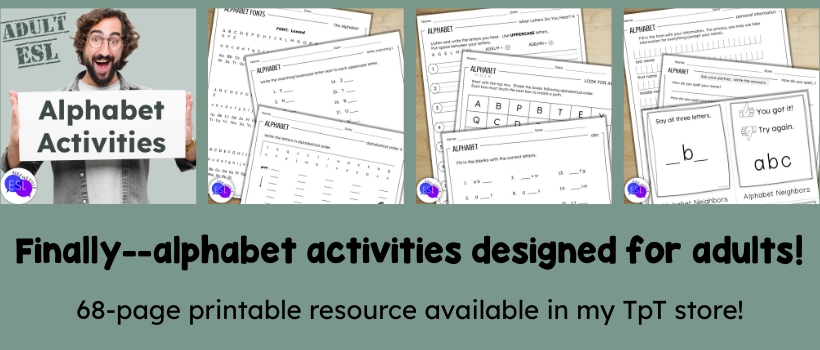
Want something ready-to-use right now?
My alphabet activities pack is available in my TpT store.
Read more about teaching adult ESL!
Teaching Animal Vocabulary in Adult ESL
3 Fun Speaking Activities for Comparative Adjectives
Conversational Visits: Why Your Students Need to Talk to Someone Besides Each Other
7 Fun Activities for Opposite Adjectives
Alphabet Freebie Alert!
I used these alphabet cards (and cards like them) to assess my new students’ knowledge of the alphabet and reinforce their understanding of uppercase and lowercase letters after we worked on the letters for a lesson or two.
You can use them as an assessment to gauge your students’ knowledge of the alphabet. Point to a letter one by one and ask them to identify the letter. This will help you determine which alphabet letters they are familiar with and which ones might need more attention. Of course, you can use the cards in the same way with students still learning their alphabet letters to offer a review opportunity. Point and ask students to say the letter’s name and, if you want to challenge them further, to make its corresponding sound.
I used a variety of fonts to add an extra layer of exposure to various letter shapes. This exposure can help students recognize alphabet letters in different styles, which is crucial as they will see a wide variety of fonts used in advertising, signs, documents, etc. You can use a card to record each student’s progress as you work through the letters. Just show the student one card while using a copy of it to mark the letters they could readily identify, were hesitant with, got incorrect, or just didn’t know.
I used to circle the ones they confidently identified, underline the ones they were hesitant with, and put an X over the ones they got wrong. That way, I never left one out. Of course, you can use your own method for marking, but however you do it, this documentation will help you track their growth and keep track of who needs additional review and who does not.
As always, adapt the pace based on your students’ needs and abilities.


